Lexus ES: Disassembly
DISASSEMBLY
CAUTION / NOTICE / HINT
HINT:
- Use the same procedure for the RH side and LH side.
- The following procedure is for the LH side.
PROCEDURE
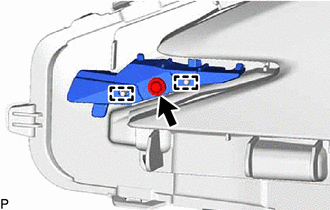
1. REMOVE HEADLIGHT ECU SUB-ASSEMBLY
Click here .gif)
2. REMOVE HEADLIGHT GASKET
Click here
3. REMOVE HEADLIGHT RIM
| (a) Remove the screw. |
|
(b) Disengage the 2 guides to remove the headlight rim.
4. REMOVE NO. 2 HEADLIGHT FITTING RIM
| (a) Remove the 2 screws. |
|

(b) Disengage the 2 guides to remove the No. 2 headlight fitting rim.
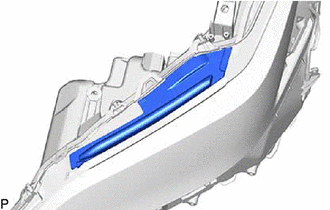
5. REMOVE HEADLIGHT UNIT ASSEMBLY
6. REMOVE HEADLIGHT SEAL (for TMC Made)
HINT:
Perform this procedure only when replacement of the headlight seal is necessary.
| (a) Remove the headlight seal. NOTICE: The headlight seal cannot be reused. |
|
READ NEXT:
 Adjustment
ADJUSTMENT CAUTION / NOTICE / HINT HINT:
Use the same procedure for the RH side and LH side.
The following procedure is for the LH side.
PROCEDURE 1. PREPARE VEHICLE FOR HEADLIGHT AIM ADJUSTME
Reassembly
REASSEMBLY CAUTION / NOTICE / HINT HINT:
Use the same procedure for the RH side and LH side.
The following procedure is for the LH side.
PROCEDURE 1. INSTALL HEADLIGHT SEAL (for TMC Made) HINT
Installation
INSTALLATION CAUTION / NOTICE / HINT HINT:
Use the same procedure for the RH side and LH side.
The following procedure is for the LH side.
PROCEDURE 1. INSTALL HEADLIGHT ASSEMBLY (a) Connect t
SEE MORE:
Transmission Range Sensor "A" Circuit Open (P070513,P070562)
DESCRIPTION The park/neutral position switch assembly detects the shift lever position and sends signals to the ECM. DTC No. Detection Item DTC Detection Condition Trouble Area MIL Memory Note P070513 Transmission Range Sensor "A" Circuit Open When the engine switch is on (IG)
On-vehicle Inspection
ON-VEHICLE INSPECTION PROCEDURE 1. INSPECT COOLING FAN SYSTEM CAUTION: To prevent injury due to contact with an operating cooling fan, keep your hands and clothing away from the cooling fan when inspecting the cooling fan system. (a) Connect the Techstream to the DLC3. (b) Turn the power switch on
© 2016-2025 Copyright www.lexguide.net

