Lexus ES: Components
COMPONENTS
ILLUSTRATION

| *A | for Driver Side | *B | for Front Passenger Side |
| *1 | COURTESY LIGHT ASSEMBLY | *2 | FRONT DOOR TRIM BOARD SUB-ASSEMBLY |
| *3 | MULTIPLEX NETWORK MASTER SWITCH ASSEMBLY WITH FRONT DOOR UPPER ARMREST BASE PANEL | *4 | NO. 2 DOOR TRIM PAD |
| *5 | POWER WINDOW REGULATOR SWITCH ASSEMBLY WITH FRONT DOOR UPPER ARMREST BASE PANEL | - | - |
ILLUSTRATION
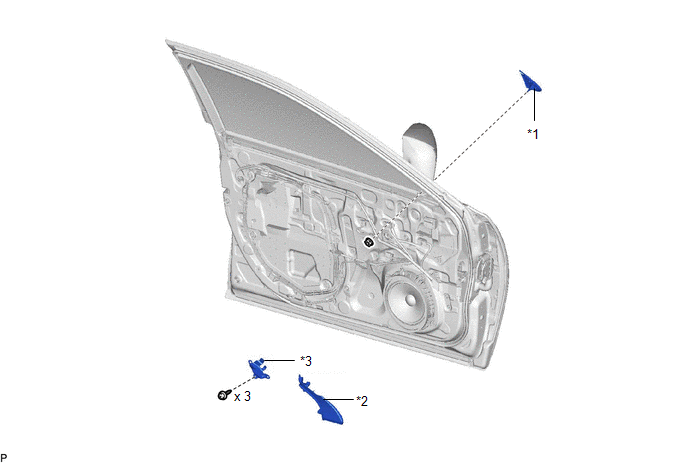
| *1 | FRONT DOOR FRONT LOWER FRAME UPPER COVER | *2 | FRONT DOOR LOWER FRAME BRACKET GARNISH |
| *3 | FRONT DOOR TRIM BRACKET | - | - |
READ NEXT:
 Removal
REMOVAL CAUTION / NOTICE / HINT HINT:
Use the same procedure for the RH side and LH side.
The following procedure is for the LH side.
PROCEDURE 1. REMOVE NO. 2 DOOR TRIM PAD Click here 2.
Installation
INSTALLATION CAUTION / NOTICE / HINT HINT:
Use the same procedure for the RH side and LH side.
The following procedure is for the LH side.
PROCEDURE 1. INSTALL FRONT DOOR FRONT LOWER FRAME UPP
SEE MORE:
Right Front Wheel Speed Sensor Internal Electronic Failure (C050649)
DESCRIPTION When the system is starting up and the skid control ECU (brake actuator assembly) detects a speed sensor circuit malfunction via the speed sensor circuit self-diagnosis function, this DTC is stored. DTC No. Detection Item DTC Detection Condition Trouble Area C050649 Right
Steering Pad Switch Circuit
DESCRIPTION This circuit sends an operation signal from the steering pad switch assembly to the radio receiver assembly. If there is an open in the circuit, the navigation system cannot be operated using the steering pad switch assembly. If there is a short in the circuit, the same condition as when
© 2016-2025 Copyright www.lexguide.net

