Lexus ES: Removal
REMOVAL
PROCEDURE
1. REMOVE INSTRUMENT PANEL FINISH PANEL END LH
Click here .gif)
2. REMOVE INSTRUMENT PANEL FINISH PANEL END RH
Click here
3. REMOVE CENTER INSTRUMENT CLUSTER FINISH PANEL SUB-ASSEMBLY
Click here
4. REMOVE SHIFT LEVER KNOB SUB-ASSEMBLY
for UA80E: Click here
for P710: Click here
5. REMOVE REAR UPPER CONSOLE PANEL SUB-ASSEMBLY
Click here
6. REMOVE UPPER CONSOLE PANEL SUB-ASSEMBLY
Click here
7. REMOVE NO. 1 STEREO JACK ADAPTER ASSEMBLY
(a) Using a screwdriver with its tip wrapped with protective tape, disengage the 2 claws and remove the No. 1 stereo jack adapter assembly as shown in the illustration.
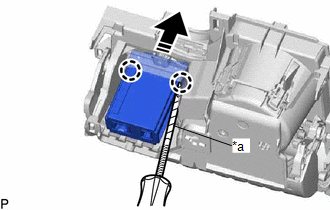
| *a | Protective Tape |
.png) | Remove in this Direction |
READ NEXT:
 Removal
REMOVAL PROCEDURE 1. REMOVE INSTRUMENT PANEL FINISH PANEL END LH Click here 2. REMOVE INSTRUMENT PANEL FINISH PANEL END RH Click here 3. REMOVE CENTER INSTRUMENT CLUSTER FINISH PANEL SUB-ASSEMBLY
Window Glass Antenna Wire
On-vehicle InspectionON-VEHICLE INSPECTION PROCEDURE 1. INSPECT WINDOW GLASS ANTENNA WIRE (a) Check the continuity of the antenna. HINT: Check for continuity at the center of each antenna wire as
SEE MORE:
Illumination for Panel Switch does not Come on with Tail Switch ON
CAUTION / NOTICE / HINT NOTICE:
Depending on the parts that are replaced during vehicle inspection or maintenance, performing initialization, registration or calibration may be needed. Refer to Precaution for Audio and Visual System.
Click here
When replacing the radio receiver assembly, alw
Dtc Check / Clear
DTC CHECK / CLEAR CHECK FOR DTC (a) Connect the Techstream to the DLC3. (b) Turn the engine switch on (IG). (c) Turn the Techstream on. (d) Enter the following menus: Body Electrical / Central Gateway / Trouble Codes. Body Electrical > Central Gateway > Trouble Codes (e) Read the DTCs. CLEAR D
© 2016-2025 Copyright www.lexguide.net

