Lexus ES manuals

Lexus ES: Disassembly

DISASSEMBLY

PROCEDURE

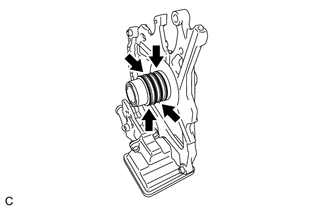
1. REMOVE CLUTCH DRUM OIL SEAL RING

(a) Remove the 4 clutch drum oil seal rings from the stator shaft assembly.

NOTICE:

Do not expand the gap of the clutch drum oil seal rings excessively.

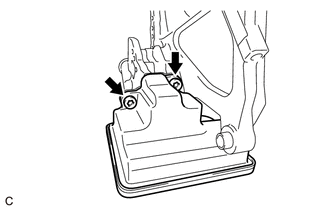
2. REMOVE OIL STRAINER ASSEMBLY

(a) Using a T30 "TORX" socket wrench, remove the 2 "TORX" bolts and oil strainer assembly from the front oil pump cover sub-assembly.

3. REMOVE STATOR SHAFT ASSEMBLY

(a) Remove the 5 bolts and stator shaft assembly from the front oil pump body.

4. REMOVE FRONT OIL PUMP DRIVE GEAR

(a) Remove the front oil pump drive gear from the front oil pump body.

5. REMOVE FRONT OIL PUMP DRIVEN GEAR

(a) Remove the front oil pump driven gear from the front oil pump body.

6. REMOVE FRONT OIL PUMP BODY

(a) Remove the front oil pump body from the front oil pump cover sub-assembly.

7. REMOVE RING PIN

(a) Remove the 2 ring pins from the front oil pump cover sub-assembly.

READ NEXT:

 Inspection

INSPECTION PROCEDURE 1. INSPECT FRONT OIL PUMP ASSEMBLY (a) Install the oil pump drive shaft sub-assembly to the front oil pump assembly. NOTICE: To avoid damaging the bush of the front oil pump as

 Reassembly

REASSEMBLY PROCEDURE 1. INSTALL RING PIN (a) Install the 2 ring pins to the front oil pump cover sub-assembly. 2. INSTALL FRONT OIL PUMP BODY (a) Install the front oil pump body to t

 Park / Neutral Position Switch

SEE MORE:

 Drive Motor "A" Inverter Voltage Sensor(VH) Circuit Voltage Above Threshold (P0C7917)

DTC SUMMARY MALFUNCTION DESCRIPTION If an overvoltage malfunction occurs in the motor inverter or generator inverter, the motor generator control ECU (MG ECU) detects the malfunction and stores this DTC. The cause of this malfunction may be one of the following: Area Main Malfunction Descriptio

 A25a-fks Battery

Components COMPONENTS ILLUSTRATION *1 BATTERY *2 NEGATIVE BATTERY TERMINAL *3 POSITIVE BATTERY TERMINAL *4 NO. 2 BATTERY CLAMP *5 BATTERY TERMINAL CAP *6

© 2016-2025 Copyright www.lexguide.net